Introduction
Appy Pie Automate Introduction
Does your app single-handedly work for all the user requirements? No, well this is quite difficult, every app basically focuses on a particular feature or group of features that makes the app unique. Same goes with your app as well.
To handle other tasks Appy Pie Integration can be a perfect solution. At Appy Pie Automate we help in automating tasks while managing the workflow with 300+ web apps available with us. Using “Connect” (the term used for automated workflow at Appy Pie Automate), Appy Pie Automate can watch for any updated information or data in connected apps and can use the data for different options as per your requirements. Connects build interconnectivity between different apps thus increasing their productivity as the automation helps to complete different operations on the basis of incoming information from the trigger apps.
Connect is a solution that can integrate different apps and help in using the best features of all apps collaboratively. A single integration can work for multiple apps connected and that too with easy steps using the UI platform of Appy Pie Automate.
Appy Pie Automate Integration - What is it?
Let us say that if you want to create an app of Google sheets to store all the data coming from the email server, you would require an email ID server, comprehensive sync between email and Google sheets, UI for helping the user to perform the authentication, and core support at every point to make the app work on different operations.
Appy Pie Automate has a far faster and user-friendly platform. Connect takes the most important parts of the API and present a curated form for the user rather than making a dedicated app for each every API. This makes it easy to perform multiple operations using different apps.
Appy Pie Automate keeps on checking for new and updated information after a clocked period of time which helps in keeping the workflow automated. Data remains updated due to cyclic operation for creating/updating data.
Taking the example of email and Google sheet API: while the sheet is required to hold all the information of the email it will have to be updated while creating new rows, making the entry of the vital information and appending it depending upon the emails rushing in. Further, it can also be used to share the data with the Google calendar to fix the appointments or other such operations depending upon the usability. What should be done at Appy Pie Automate to make such conversations between the Google sheet and email possible?
First of all, you must create your email API along with authorization to OAuth V2 tool of Appy Pie Automate. This will help in enabling the user of your app to access his or her account with simple login credentials and access the standard information.
Then, as the next step, you will be adding the Triggers. These are basically the API calls that help Appy Pie Automate in identifying the new mail along with draft emails, categorization such as important or urgent and attachments.
Next, you will be working on adding some Actions. Actions basically enable Appy Pie Automate to revert the emails, organize the inbox according to various labels and create drafts. This can actually help your app users to access almost every major feature of the email and work with Appy Pie Automate UI. You can add searches as well to help the user in finding the relevant emails and process them accordingly.
These initiations will make sure that the user could automate each part of your app in the Appy Pie connect environment. However, some of the facilities such as IMAP or checking out the history of the email may not be relevant in the case of Appy Pie Automate via API calls.
Your app in Appy Pie Automate will represent the same featured functionalities, thus brainstorm and include every important aspect in your API calls to make things smooth and user-friendly. The API should include all those triggers which would help in adding and/or updating new data. Also, the API call including the feature to add or format the data in action and searches (if available) feature can be made after brainstorming the app to make the Connect strong and meaningful. Some of the features such as settings of the user account or data deletion can be neglected while creating the API in order to avoid any misuse or to prevent temperament with your app. Also, such features are not commonly used by any of the users.
Appy Pie Automate Integrations - What’s Included?
Appy Pie Automate basically has three main requirements for integration to happen, viz. Authentication, API including features and forms.
Authentication, to have access to the API authorization is a primary requirement in case of any app integration. With the help of access ID and password, the API helps to connect with the user account and opens the permit to different functionalities of the application. Thus, to authenticate, before making an integration Appy Pie Automate will ask for the authentication method, you can choose accordingly and can direct the flow to help the users in accessing your app.
Throughout the integration, Appy Pie Automate will use the same schema to access the information and give permission to the users. Once the user authenticates his/her account at Appy Pie Automate, he/she does not require to re-authenticate the app and can use any part of action and trigger to manage data (however, change in the authentication credentials will be required to access any other account of the same user in your app). This will help in deducting the time to access the app features and the user can actually feel as if accessing your app rather than some other alienated platform.
This authentication enables the user to access triggers and actions, and without the same none of the users shall be allowed to access any part of your app. Thus, it is vital to map a proper authentication method to avoid any glitch in setting up the integration. Also, without authentication, you cannot move further with the steps to add triggers and actions, create forms or add searches.
Now, find the most relevant parts of your app which shall help the users on Appy Pie Automate. All the parts that have the new data or updated information which may help the user to manage the workflow shall be a part of the API calls. Plan and prepare the list of all such parts of your app and build an API which shall help in creating triggers with all the input data required for the same.
After this, put the input data in forms, triggers mostly fetch all the relevant information from the API calls and thus extra details are not much required to filter new data. Whereas, in case of actions, they always require information to add and/or update the data. There is the information flow that has to be added such as in case of email; the email address, name, and other important tasks are required to be added in a defined format. For this form helps the user to understand and fill in the information along with additional information in plain text format or else mapped input fields. Thus, it is important to provide the form with the Action tab of your app at Appy Pie Automate.
It is easy to create a form for actions in the Input Designer at Appy Pie Automate (the input designer is also available for the triggers which can be used as per your app requirement). You need to point out and list all the important API endpoints required to create and find items to complete the actions. Similar form fields should be created to match the API endpoint while creating integration in Appy Pie Automate. This will help in creating the action with a simple form and handle the app as per the requirement.
The same step has to be repeated for creating various actions that can be used in Connect integration. After adding up all the actions and defining the Input Designer, test your action as without testing, the actions will not be approved at Appy Pie Automate. Once the Actions are defined, the app can be submitted at Appy Pie Automate for the final release.
How Does Appy Pie Automate Work?
Appy Pie Automate is a user-friendly platform where you can build integrations for your app using UI based development platform. Visual builder helps in getting the information about the integration steps and show the form layout screens in parallel for general app users.
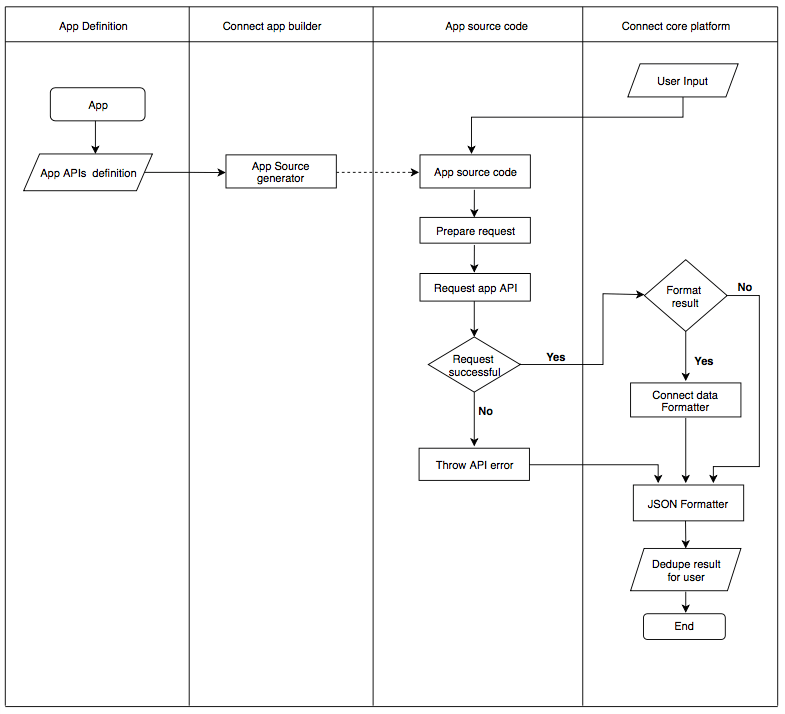
Appy Pie Automate UI based integration platform works on three basic steps to authenticate the app, triggers and actions. These all are defined through various API calls. Appy Pie Automate merge your app with data received from users connects, then prepares the API requests which includes authentication details and then makes API calls. API responses are then parsed in individual fields at Appy Pie Automate, any duplicate result is then filtered from Trigger and Search steps which work on the resulting array.
After this, the next step is to determine the action depending upon the triggers. If Trigger finds the new or modified data then the resulting steps will follow at Connect. Similarly, if Search finds out the relevant result then only the next set of instructions will be executed. Appy Pie Automate will check the resource of the search result and follow the instruction in Connect to all the subsequent data. However, if the result is not found then the Connect will not execute the Action to add or update the particular item that would have been customized by the user of your app. It may also affect the result of further steps that have been related to the end result in the various Connects built by the user. Thus, the determination of the exact result is really important to run the Connect successfully.
Now, as you are aware of how Appy Pie connect works, let us start with Appy Pie Automate Integration. Get a quick guide tour to start with the operation or read the detailed documentation further to understand the integration in a better way.